Chapter 5 : Kernel Initialization
tags: gnitnaw twlkh
寫在前面
這章的重點在bootloader之後,也就是kernel開始接手系統後會發生的事。寫心得的同時我會儘量使用RPi kernel(v.4.4.31)驗證本書的內容。如果有興趣補充的請自便(為方便編輯,加入comment後請留下大名)。
5.1 Composite Kernel Image: Piggy and Friend
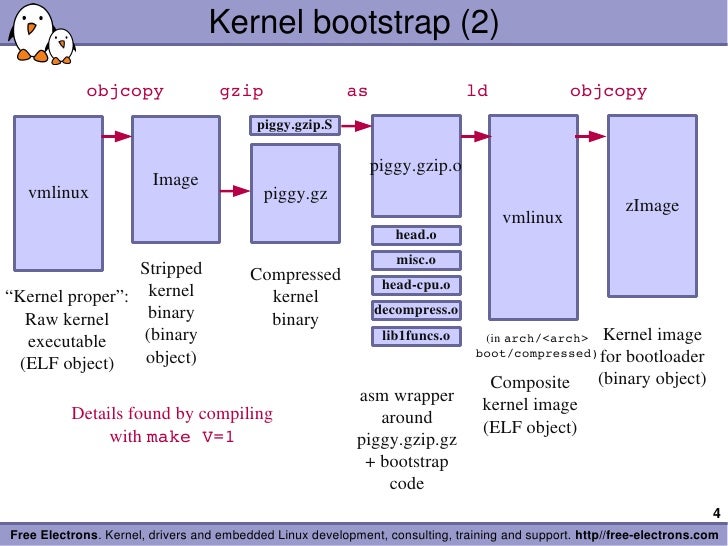
如果從kernel編譯過程來看vmlinux是如何組成的話:
make ARCH=arm CROSS_COMPILE=arm-linux-gnueabihf- zImage -j4
(....)
  LD      vmlinux
  SORTEX  vmlinux
  SYSMAP  System.map
  OBJCOPY arch/arm/boot/Image
  Kernel: arch/arm/boot/Image is ready
  Kernel: arch/arm/boot/Image is ready
  LDS     arch/arm/boot/compressed/vmlinux.lds
  AS      arch/arm/boot/compressed/head.o
  GZIP    arch/arm/boot/compressed/piggy.gzip
  CC      arch/arm/boot/compressed/misc.o
  CC      arch/arm/boot/compressed/decompress.o
  CC      arch/arm/boot/compressed/string.o
  AS      arch/arm/boot/compressed/lib1funcs.o
  AS      arch/arm/boot/compressed/ashldi3.o
  AS      arch/arm/boot/compressed/bswapsdi2.o
  AS      arch/arm/boot/compressed/piggy.gzip.o
  LD      arch/arm/boot/compressed/vmlinux
  OBJCOPY arch/arm/boot/zImage
  Kernel: arch/arm/boot/zImage is ready
這裡列出比較重要的幾個: | 檔案 | 功能 | RPi source | | --- | --- | ----- | |vmlinux|vmlinux是ELF格式binary檔案,為最原始也未壓縮的kernel鏡像。|./vmlinux| |System.map|在符號名稱與它們的記憶體位置間的查詢表格|./System.map| |Image|vmlinux經過objcopy處理,把代碼從中抽出(去除註解或debugging symbols)以用於形成可執行的機器碼。不過Image此時還不能直接執行,需加入metadata資訊。|./arch/arm/boot/Image| |head.o|ARM特有的code,用來接受從bootloader送來的系統控制權,source code head.S是用組語(arm-assembly)寫成。|./arch/arm/boot/compressed/head.S| |piggy.gzip|被gzip壓縮的Image|./arch/arm/boot/compressed/piggy.gzip| |piggy.gzip.o|用組語寫成,可被用來連結到別的物件,例如piggy.gzip。|./arch/arm/boot/compressed/piggy.gzip.S| |misc.o|用來解壓縮。|./arch/arm/boot/compressed/misc.c| |compressed/vmlinux|結合System.map等檔案並產生鏡像檔,意義跟一開始的vmlinux不太一樣。|./arch/arm/boot/compressed/vmlinux| |zImage|最後產生的鏡像檔,已經被壓縮過。|./arch/arm/boot/zImage|
以下是我實際用RPi驗證的結果(make ARCH=arm CROSS_COMPILE=arm-linux-gnueabihf- zImage V=1)。
5.1.1 Image
vmlinux被objcopy包到Image:
- -O:告訴objcopy要生成一個binary檔。
- -R:移除ELF(vmlinux)中名稱為.comment的section。
- -S:去除debug symbols。
arm-linux-gnueabihf-objcopy -O binary -R .comment -S vmlinux arch/arm/boot/Image
5.1.2 Architecture
Image被gzip壓縮成piggy.gzip,這是說如果gzip不成功就砍掉piggy.gzip?
(cat arch/arm/boot/compressed/../Image | gzip -n -f -9 > arch/arm/boot/compressed/piggy.gzip) || (rm -f arch/arm/boot/compressed/piggy.gzip ; false)
然後piggy.gzip.S被生成(不過我看不懂這個步驟)。
arm-linux-gnueabihf-gcc -Wp,-MD,arch/arm/boot/compressed/.piggy.gzip.o.d -nostdinc -isystem /usr/lib/gcc-cross/arm-linux-gnueabihf/5/include -I./arch/arm/include -Iarch/arm/include/generated/uapi -Iarch/arm/include/generated -Iinclude -I./arch/arm/include/uapi -Iarch/arm/include/generated/uapi -I./include/uapi -Iinclude/generated/uapi -include ./include/linux/kconfig.h -D__KERNEL__ -mlittle-endian -Iarch/arm/mach-bcm2709/include -D__ASSEMBLY__ -mabi=aapcs-linux -mno-thumb-interwork -mfpu=vfp -funwind-tables -marm -D__LINUX_ARM_ARCH__=7 -march=armv7-a -include asm/unified.h -msoft-float -DCC_HAVE_ASM_GOTO -DZIMAGE -c -o arch/arm/boot/compressed/piggy.gzip.o arch/arm/boot/compressed/piggy.gzip.S
這個piggy.gzip.S檔案內容如下,內含剛剛提到的piggy.gzip。
        .section .piggydata,#alloc
        .globl  input_data
input_data:
        .incbin "arch/arm/boot/compressed/piggy.gzip"
        .globl  input_data_end
input_data_end:
input_data和input_data_end這兩個label是用來當boundary的(介於這兩個label的才是要載入的binary檔案)。大概可以知道,這個piggy.gzip.S的功能就是把piggy.gzip提供給"kernel鏡像載入前"的啟動程序(其命名piggy帶有揹負之意)。 :::warning 書中有一段我不太懂: It is triggered by the .incbin assembler preprocessor directive, which can be viewed as the assembler's version of a #include file. In summary, the net result of this assembly language file is to contain the compressed binary kernel image as a payload within another imagethe bootstrap loader. :::
:::info .incbin 是把 binary file 變成程式的 data 的一種方法(assembly directive)。舉例來說用這方法你可以把一個圖檔內容變成程式的data array。在這邊的用法就是把壓縮完的 kernel 變成第二階段的 vmlinux 裡的一個 data(可透過變數 input_data 來讀取)。 :::
5.1.3 Bootstrap Loader
如果bootloader是前半段,那bootstrap loader就是後半段,其作用主要在於:
- 初始CPU/SoC與需要的記憶體。
- 解壓縮kernel鏡像(有壓縮的話,有些bootstrap loader還會使用checksum確認是否正確)並將其安置。
- 載入解壓縮完畢的kernel鏡像。
bootloader與bootstrap loader的不同在於:前者在電源被打開始開始啟動,並不依賴kernel;後者則處於bootloader結束與kernel介入之前的過渡期。我們可以把bootstrap loader的流程概括如下:
- 當bootloader把控制權交出,
head.o(與相關檔案)接住了控制權,然後針對不同的處理器開始了其初始化流程(打開特殊指令或cache、關掉中斷等)。 misc.o根據piggy.gzip.S找到並解壓縮Image。- 其他針對特定處理器的初始流程。
- 載入Image。
5.1.4 Boot Message
我看了一下我的RPi的dmesg,並沒有如書中提到有decompress_kernel的相關訊息(dmesg的第1條訊息是從start_kernel來的,就算開了initcall_debug也一樣),不過原始檔misc.c裡面的確有這個function
void
decompress_kernel(unsigned long output_start, unsigned long free_mem_ptr_p,
                unsigned long free_mem_ptr_end_p,
                int arch_id)
{
        int ret;

        __stack_chk_guard_setup();

        output_data             = (unsigned char *)output_start;
        free_mem_ptr            = free_mem_ptr_p;
        free_mem_end_ptr        = free_mem_ptr_end_p;
        __machine_arch_type     = arch_id;

        arch_decomp_setup();

        putstr("Uncompressing Linux...");
        ret = do_decompress(input_data, input_data_end - input_data,
                            output_data, error);
        if (ret)
                error("decompressor returned an error");
        else
                putstr(" done, booting the kernel.\n");
}
:::warning 不過我覺得奇怪,bootstrap loader的過程怎麼會顯示在dmesg裡,如果bootstrap真的是介於bootloader跟kernel介入之間的過渡期的話,那它怎麼有機會管到pr_info那去?kernel應該還沒有機會初始關於pr_info的設定不是嗎? ::: 然後dmesg裡面的確有kernel version string,這行是對應到start_kernel中的pr_notice("%s", linux_banner):
[    0.000000] Linux version 4.4.21-rt27 (wtchen@wtchen-Inspiron-5423) (gcc version 5.4.0 20160609 (Ubuntu/Linaro 5.4.0-6ubuntu1~16.04
.1) ) #1 PREEMPT RT Mon Sep 19 16:03:55 CEST 2016
這邊的#1是Build number,每重新compile一次就會被./scripts/mkversion增加1,可用make mrproper使之重新回到1。
但是我在原始檔的init/main.c裡面的start_kernel裡並沒有看到相關部份:
// scripts/mkcompile_h
5.2 Initialization Flow of Control
Linux啟動流程大概是這樣:
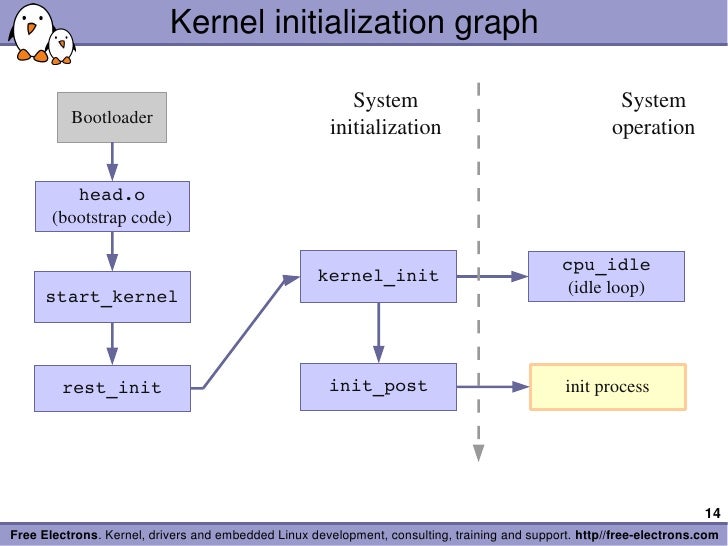
5.2.1 Kernel Entry Point: head.o
當head.o從bootstrap loader拿到控制權,kernel是處於真實模式(real mode),可以直接讀取physical memory。RPi的head.o內容可以在./arch/arm/kernel/head.S找到,以後可以根據此檔案研究一下低階的ARM操作。此module主要功能為:
- 確認處理器與架構。
- 新增並初始page table。
- 打開MMU。從此時開始,kernel可以使用virtual memory。
- 建立基本的錯誤偵測與回報。
- 控制權交給main.c裡的
start_kernel()。以下是我在head-common.S(被include進head.S)找到的相關片段:
 THUMB( ldr sp, [r3, #16]       )
    str r9, [r4]            @ Save processor ID
    str r1, [r5]            @ Save machine type
    str r2, [r6]            @ Save atags pointer
    cmp r7, #0
    strne   r0, [r7]            @ Save control register values
    b   start_kernel
ENDPROC(__mmap_switched)
由於真實模式可被定址的記憶體只有1MB,所以head.o能做的事不多,如果不是非常必要,最好不要嘗試去動這個步驟,不然容易因為page fault發生意想不到的問題,真的要更改的話請盡可能在MMU啟動之後進行,難度會降低很多。
5.2.2 ./init/main.c
./init/main.c的主要函式為start_kernel(),這個函式會呼叫setup_arch(&command_line)函式(定義在./arch/arm/kernel/setup.c)來設定整個架構,包括辨別CPU並將其進階功能初始化。此函式的頭兩行:
void __init setup_arch(char **cmdline_p)
{
        const struct machine_desc *mdesc;

        setup_processor();
這個setup_processor()是用來確認CPU ID而且顯示其資訊。dmesg可看到:
[    0.000000] CPU: ARMv6-compatible processor [410fb767] revision 7 (ARMv7), cr=00c5387d
[    0.000000] CPU: PIPT / VIPT nonaliasing data cache, VIPT nonaliasing instruction cache
[    0.000000] Machine model: Raspberry Pi Model B Plus Rev 1.2
setup_arch最後會做一些machine-dependent的初始化,至於會怎麼做不同結構有不同作法。ARM的話它會指到./arch/arm/mach-*去抓該結構對應的檔案(使用第4章說的.config去設定Makefile),MIPS的作法也類似,Power Architecture則會放在platforms資料夾。
5.3 Kernel Command-Line Processing
一樣,RPi的dmesg
[ 0.000000] Kernel command line: dma.dmachans=0x7f35 bcm2708_fb.fbwidth=656 bcm2708_fb.fbheight=416 bcm2708.boardrev=0x10 bcm2708.serial=0x38df2486 smsc95xx.macaddr=B8:27:EB:DF:24:86 bcm2708_fb.fbswap=1 bcm2708.uart_clock=48000000 bcm2708.disk_led_gpio=47 bcm2708.disk_led_active_low=0 vc_mem.mem_base=0x1ec00000 vc_mem.mem_size=0x20000000 dwc_otg.lpm_enable=0 console=ttyAMA0,115200 console=tty1 root=/dev/mmcblk0p2 rootfstype=ext4 elevator=deadline fsck.repair=yes rootwait
bootloader把控制權交給bootstrap loader時會附送已經規範好的kernel命令列 (kernel command line)。如果你是用grub或lilo等多重開機程式(其實他們也是bootloader),可以用鍵盤選擇作業系統,這就相當於用kernel命令列去改變boot參數。./Documentation/kernel-parameters.txt中有註明已經定義且可用的參數(不過需注意因為kernel更新太快Documentation的資訊會跟不上),開發者也可自行定義參數。 :::info 在RPi,/boot/cmdline.txt可用來輸入kernel command line,例如:dwc_otg.lpm_enable=0 console=serial0,115200 console=tty1 root=/dev/mmcblk0p2 rootfstype=ext4 elevator=deadline fsck.repair=yes rootwait :::
5.3.1 __setup Macro
為了要讓kernel message早點生效(這樣有問題才知道),console initialization必須愈早做愈好。此物件為printk.o,原始檔在./kernel/printk/printk.c,其中的函式console_setup(char *str)便是console initialization。以下為console_setup(char *str)的原始碼,可以看到最後__setup("console=", console_setup)把console定義成buf。
static int __init console_setup(char *str)
{
        char buf[sizeof(console_cmdline[0].name) + 4]; /* 4 for "ttyS" */
(...)
        if (str[0] >= '0' && str[0] <= '9') {
                strcpy(buf, "ttyS");
                strncpy(buf + 4, str, sizeof(buf) - 5);
        } else {
                strncpy(buf, str, sizeof(buf) - 1);
        }
        buf[sizeof(buf) - 1] = 0;
        options = strchr(str, ',');
        if (options)
                *(options++) = 0;
(...)
        for (s = buf; *s; s++)
                if (isdigit(*s) || *s == ',')
                        break;
        idx = simple_strtoul(s, NULL, 10);
        *s = 0;

        __add_preferred_console(buf, idx, options, brl_options);
        console_set_on_cmdline = 1;
        return 1;
}
__setup("console=", console_setup);
這個__setup的Macro是定義在./include/linux/init.h:
#define __setup_param(str, unique_id, fn, early)                        \
        static const char __setup_str_##unique_id[] __initconst         \
                __aligned(1) = str;                                     \
        static struct obs_kernel_param __setup_##unique_id              \
                __used __section(.init.setup)                           \
                __attribute__((aligned((sizeof(long)))))                \
                = { __setup_str_##unique_id, fn, early }

#define __setup(str, fn)                                                \
        __setup_param(str, fn, fn, 0)
所以__setup("console=", console_setup)會被前置處理為__setup_param("console=", console_setup, console_setup, 0),然後變成
static const char __setup_str_console_setup[] __initconst __aligned(1) = "console=";
static struct obs_kernel_param __setup_console_setup __used __section(.init.setup) __attribute__((aligned((sizeof(long))))) = { __setup_str_console_setup, console_setup, early }
:::warning 我看不懂__aligned(1)和__used的作用。 ::: :::info
- 編譯器通常可透過一些擴充語法來為函數或變數設置屬性。一般比較常用到的例子如變數的字節對齊(aligment),例如希望某個變數的位址對齊 4-byte aligment。
- 由於每個編譯器擴充語法不同,甚至不同版本關鍵字不同等。所以程式中通常會透過 macro 來定義通用規則以達到較好的可移植性。如以下語法 #define __used
__attribute__ ((__used__)) - 在 GCC 中可在宣告時加上
__attribute__來設置屬性。如以下連結介紹 https://goo.gl/aJstCH - __aligned(1) 不太確定是否有特殊涵意,通常是 2-byte 以上會特別設置。
- 寫程式時有時候會看到編譯時會吐出 compiling warning,某些狀況可能是人為疏忽,會造成程式運行時不可預期的錯誤(有時在最佳化後才會出現問題)。嚴謹的專案會盡可能清除所有的 compiling warning。kernel 中將所有的 compiling warning 都轉換成 compiling error(GCC 提供的功能)。其中有一項 warning 是關於定義卻未被使用(
defined but not usedorset but not used),但在某些情況下這是我們預期的行為時,可設置__used這個屬性告知編譯器,希望保留變數不被最佳化移除,設置後也不會吐出這個 compiling warning (或是 error)了。如以下連結的討論 http://stackoverflow.com/questions/31637626/whats-the-usecase-of-gccs-used-attribute :::
第2行去掉對齊設定就變成
static struct obs_kernel_param __setup_console_setup __section(.init.setup)
= { __setup_str_console_setup, console_setup, early }
所以這兩行code做的就是:
- 編譯器創造出一個叫作
__setup_str_console_setup[]的區域字串常數為"console"; - 編譯器創造出一個類型為
struct obs_kernel_param的靜態變數__setup_console_setup,裡面含有三個元件:剛剛創的字串常數__setup_str_console_setup[],一個指向setup function的函數指標(此例來說就是console_setup),一個flag。 - 在連結期間(link stage),這兩行定義出的結構都會被塞到ELF物件的
.init.setup部位。
以下是從./init/main.c摘錄出如何處理struct obs_kernel_param物件的函式,我以註解的方式說明我對這code的理解。
// 每跑一次__setup Macro,就會多一個struct obs_kernel_param物件。這些物件形成一個陣列被放在.init.setup裡,第1個跟最後一個分別是__setup_start[]與__setup_end[]。
extern const struct obs_kernel_param __setup_start[], __setup_end[];

static int __init obsolete_checksetup(char *line) //line指要處理的字串,本例來說就是"console=tty1"
{
    const struct obs_kernel_param *p;
    int had_early_param = 0;
    //針對每個struct obs_kernel_param物件,從__setup_start[]到__setup_end[]
    p = __setup_start;
    do {
        int n = strlen(p->str);
        if (parameqn(line, p->str, n)) {    // 定義在./kernel/params.c,作為解析
            if (p->early) {            // 如果已經被main.c中的do_early_param定義過了
                /* Already done in parse_early_param?
                 * (Needs exact match on param part).
                 * Keep iterating, as we can have early
                 * params and __setups of same names 8( */
                if (line[n] == '\0' || line[n] == '=')
                    had_early_param = 1;
            } else if (!p->setup_func) {        //定義的函數指標執行後傳回的值非1
                pr_warn("Parameter %s is obsolete, ignored\n", p->str);
                return 1;
            } else if (p->setup_func(line + n)) // 字串後面還有字?不懂...
                return 1;
        }
        p++;
    } while (p < __setup_end);
    return had_early_param;
}
在./include/linux/init.h定義的有關init的macro有:
#define __init          __section(.init.text) __cold notrace
#define __initdata      __section(.init.data)
#define __initconst     __constsection(.init.rodata)            //只使用一次的data
含有這些macro的變數(__init.data)或函式(__init)作kernel做完這個module_init function過後就會釋放其佔有的資源,也就是說在boot步驟結束前就會被清除,可以從dmesg中看到相關訊息。
[ 3.340251] Freeing unused kernel memory: 372K (c0803000 - c0860000)
:::info obsolete_開頭的函式是屬於module_param* macro(參見./include/linux/moduleparam.h),見Ch8。 :::
5.4 Subsystem Initialization
在./init/main.c中,要初始化子系統:
- 有些重要的子系統如
timer或console已經被main.c預設初始化。 - 其他子系統可以用前一節說的
__setup。 - 特殊架構的話,可以自己寫routine,範例可看
./arch/arm/kernel/setup.c的customize_machine(void)。
static int __init customize_machine(void)
{
    /*
     * customizes platform devices, or adds new ones
     * On DT based machines, we fall back to populating the
     * machine from the device tree, if no callback is provided,
     * otherwise we would always need an init_machine callback.
     */
    of_iommu_init();
    if (machine_desc->init_machine)
        machine_desc->init_machine();
#ifdef CONFIG_OF
    else
        of_platform_populate(NULL, of_default_bus_match_table,
                                        NULL, NULL);
#endif
    return 0;
}
arch_initcall(customize_machine);
5.4.1 __initcall
上一節說的arch_initcall一樣是定義在./include/linux/init.h:
#define __define_initcall(fn, id) \
        static initcall_t __initcall_##fn##id __used \
        __attribute__((__section__(".initcall" #id ".init"))) = fn; \
        LTO_REFERENCE_INITCALL(__initcall_##fn##id)

/*
 * Early initcalls run before initializing SMP.
 *
 * Only for built-in code, not modules.
 */
#define early_initcall(fn)              __define_initcall(fn, early)

/*
 * A "pure" initcall has no dependencies on anything else, and purely
 * initializes variables that couldn't be statically initialized.
 *
 * This only exists for built-in code, not for modules.
 * Keep main.c:initcall_level_names[] in sync.
 */
#define pure_initcall(fn)               __define_initcall(fn, 0)

#define core_initcall(fn)               __define_initcall(fn, 1)
#define core_initcall_sync(fn)          __define_initcall(fn, 1s)
#define postcore_initcall(fn)           __define_initcall(fn, 2)
#define postcore_initcall_sync(fn)      __define_initcall(fn, 2s)
#define arch_initcall(fn)               __define_initcall(fn, 3)
#define arch_initcall_sync(fn)          __define_initcall(fn, 3s)
#define subsys_initcall(fn)             __define_initcall(fn, 4)
#define subsys_initcall_sync(fn)        __define_initcall(fn, 4s)
#define fs_initcall(fn)                 __define_initcall(fn, 5)
#define fs_initcall_sync(fn)            __define_initcall(fn, 5s)
#define rootfs_initcall(fn)             __define_initcall(fn, rootfs)
#define device_initcall(fn)             __define_initcall(fn, 6)
#define device_initcall_sync(fn)        __define_initcall(fn, 6s)
#define late_initcall(fn)               __define_initcall(fn, 7)
#define late_initcall_sync(fn)          __define_initcall(fn, 7s)
(...)
所以arch_initcall(customize_machine)經過首次預處理後會變成__define_initcall(customize_machine, 3),再次預處理然後去掉__section(.initcall3.init)(這表示相關變數會放在此section)相關部份就變成:
static initcall_t __initcall_customize_machine3 = customize_machine;
LTO_REFERENCE_INITCALL(__initcall_customize_machine3)
:::warning 書中是說會變成static initcall_t __initcall_customize_machine = customize_machine,跟我判斷的不太一樣耶。 :::
要注意的是.initcallN.init這部份,這個N代表初始化的順序(level),在__define_initcall的程式碼中可發現,arch_initcall是排在core_initcall等後面。
不管是__setup還是__initcall,這些macro是提供一個可以初始子系統,並且在初始完成後釋放佔用的記憶體的機制。 __initcall macro是在kernel 2.6之後才開始加入,至於之前是使用device_initcall macro (level=6)。
5.5 init Thread
./init/main.c中的start_kernel函式跑完基本的初始化程序後,函式最後就會呼叫rest_init()函式產生第1個thread,就是init()。由於它是第1個process,所以它的PID=1。這個process是所有user space process的老爸,換言之,所有的user space process皆是由init()用fork()分出來的。以下是rest_init()的內容:
static noinline void __init_refok rest_init(void)
{
    int pid;

    rcu_scheduler_starting(); // 啟動rcu_scheduler
    smpboot_thread_init();

    kernel_thread(kernel_init, NULL, CLONE_FS);    // 建立第1個thread!執行kernel_init
    numa_default_policy();
    pid = kernel_thread(kthreadd, NULL, CLONE_FS | CLONE_FILES);//第2個thread,kthreadd,管理調度其他kernel thread
    rcu_read_lock();
    kthreadd_task = find_task_by_pid_ns(pid, &init_pid_ns);
    rcu_read_unlock();
    complete(&kthreadd_done); //得到kthreadd的資訊,確認kthreadd執行成功並通知kernel_init thread

    init_idle_bootup_task(current); 把所在process設成idle狀態
    schedule_preempt_disabled();把所在process設成可搶佔,但不重新排程
    /* Call into cpu_idle with preempt disabled */
    cpu_startup_entry(CPUHP_ONLINE); // kernel進入idle狀態,用loop消耗時間,此函式不return,有必要隨時可被搶佔。
}
5.5.1 initcalls
kernel_init thread被建立了以後,此函式先呼叫的是kernel_init_freeable()函式,然後kernel_init_freeable()中間會呼叫do_basic_setup,do_basic_setup中間又會呼叫do_initcalls(),這個函式就是用來處理之前提到的__initcall的,會依序處理在不同.initcallN.init的參數。
5.5.2 initcall_debug
RPi可以在/boot/cmdline.txt內加入initcall_debug=1,把debug info.打開,重新開機後用dmesg就能看了。
5.5.3 Final Boot Steps
書中所說的這部份init_post()在已經被併到kernel_init最後面了,內容如下:
    if (execute_command) {
        ret = run_init_process(execute_command);
        if (!ret)
            return 0;
        panic("Requested init %s failed (error %d).",        // 大家都不想看到的kernel panic
            execute_command, ret);
    }
    if (!try_to_run_init_process("/sbin/init") ||
        !try_to_run_init_process("/etc/init") ||
        !try_to_run_init_process("/bin/init") ||
        !try_to_run_init_process("/bin/sh"))
        return 0;

    panic("No working init found.  Try passing init= option to kernel. "
        "See Linux Documentation/init.txt for guidance.");
對照一下RPi的ps -ef:
pi@raspberrypi:~/git/RTPiDrone $ ps -ef
UID        PID  PPID  C STIME TTY          TIME CMD
root         1     0  0 17:01 ?        00:00:04 /sbin/init
root         2     0  0 17:01 ?        00:00:00 [kthreadd]
可以知道,kernel_init執行到/sbin/init後(link到/lib/systemd/systemd)就一直run沒有停下來。當系統必須做其他的事(例如某user要執行程式)時,此process(或某個子process)就會fork()出一個分身去處理,證據如下:
pi@raspberrypi:~/git/RTPiDrone $ pstree
systemd─┬─agetty
        ├─avahi-daemon───avahi-daemon
        ├─cron
        ├─dbus-daemon
        ├─dhcpcd
        ├─ntpd
        ├─rsyslogd─┬─{in:imklog}
        │          ├─{in:imuxsock}
        │          └─{rs:main Q:Reg}
        ├─sshd───sshd───sshd───bash───pstree
        ├─systemd───(sd-pam)
        ├─systemd-journal
        ├─systemd-logind
        ├─systemd-udevd
        ├─thd
        └─wpa_supplicant
同場加映:RPi的bootloader
- 當RPi一開機,ARM core為off,SDRAM還不能用,只有GPU是On。
- GPU開始第1階段的
bootloader(儲存在ROM裡):讀取SD並載入第2階段的bootloader (/boot/bootcode.bin)到L2 cache。 bootcode.bin將SDRAM啟動並繼續第3階段的bootloader:讀取GPU firmware(/boot/start.elf)。start.elf讀取config.txt,cmdline.txt和kernel.img(即zImage),以啟動bootstrap Loader。
5.6 Summary
靠!一堆好複雜的code!終於看完了!- 因為kernel超複雜,所以瞭解其架構很重要。