定義Layouts
編寫: roya 原文:https://developer.android.com/training/wearables/ui/layouts.html
可穿戴設備使用與手持Android設備同樣的佈局技術,但需要有具體的約束來設計。不要以一個手持app的角度開發功能和UI並期待得到一個好的體驗。關於如何設計優秀的可穿戴應用的更多信息,請閱讀Android Wear Design Guidelines。
當為Android Wear應用創建layout時,我們需要同時考慮方形和圓形屏幕的設備。在圓形Android Wear設備上所有放置在靠近屏幕邊角的內容可能會被剪裁掉,所以為方形屏幕設計的layouts在圓形設備上不能很好地顯示出來。對這類問題的示範請查看這個視頻Full Screen Apps for Android Wear。
舉個例子,figure 1展示了下面的layout在圓形和方形屏幕上的效果:
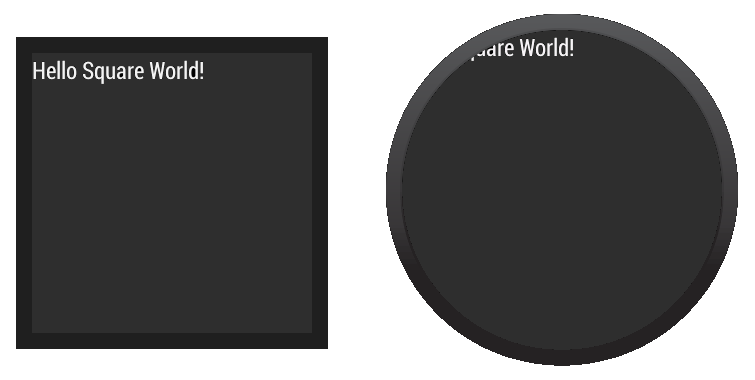
Figure 1. 為方形屏幕設計的layouts在圓形設備上不能很好顯示的示範
<LinearLayout xmlns:android="http://schemas.android.com/apk/res/android"
    xmlns:tools="http://schemas.android.com/tools"
    android:layout_width="match_parent"
    android:layout_height="match_parent"
    android:orientation="vertical">

    <TextView
        android:id="@+id/text"
        android:layout_width="wrap_content"
        android:layout_height="wrap_content"
        android:text="@string/hello_square" />
</LinearLayout>
上述範例的文本沒有正確地顯示在圓形屏幕上。
Wearable UI庫為這個問題提供了兩種不同的解決方案:
-
為圓形和方形屏幕定義不同的layouts。我們的app會在運行時檢查設備屏幕形狀並inflate正確的layout。
-
用一個包含在庫裡面的特殊layout同時適配方形和圓形設備。這個layout會在不同形狀的設備屏幕窗口中插入不同的間隔。
當我們希望應用在不同形狀的屏幕上看起來不同時,一般會使用第一種方案。當我們希望用一個相似的layout在兩種屏幕上且在圓形屏幕上沒有視圖被邊緣剪裁時,可以使用第二種方案。
添加Wearable UI庫
當我們使用Android Studio的工程嚮導時,Android Studio會自動地在wear模塊中包含Wearable UI庫。為了在工程中編譯到這個庫,確保 Extras > Google Repository 包已經被安裝在Android SDK manager裡,下面的依賴被包含在wear模塊的build.gradle文件中:
dependencies {
    compile fileTree(dir: 'libs', include: ['*.jar'])
    compile 'com.google.android.support:wearable:+'
    compile 'com.google.android.gms:play-services-wearable:+'
}
要實現以下的佈局方法需要用到 'com.google.android.support:wearable' 依賴。
瀏覽API reference documentation查看Wearable UI庫的類。
為方形和圓形屏幕指定不同的Layouts
包含在Wearable UI庫中的WatchViewStub類允許我們為方形和圓形屏幕指定不同的layout。這個類會在運行時檢查屏幕形狀並inflate相應的layout。
為了在我們的應用中使用這個類以應對不同的屏幕形狀,我們需要:
- 添加
WatchViewStub作為activity的layout的主元素。 - 使用
rectLayout屬性為方形屏幕指定一個layout文件。 - 使用
roundLayout屬性為圓形屏幕指定一個layout文件。
類似下面定義activity的layout:
<android.support.wearable.view.WatchViewStub
    xmlns:android="http://schemas.android.com/apk/res/android"
    xmlns:app="http://schemas.android.com/apk/res-auto"
    xmlns:tools="http://schemas.android.com/tools"
    android:id="@+id/watch_view_stub"
    android:layout_width="match_parent"
    android:layout_height="match_parent"
    app:rectLayout="@layout/rect_activity_wear"
    app:roundLayout="@layout/round_activity_wear">
</android.support.wearable.view.WatchViewStub>
在activity中inflate這個layout:
@Override
protected void onCreate(Bundle savedInstanceState) {
    super.onCreate(savedInstanceState);
    setContentView(R.layout.activity_wear);
}
然後為方形和圓形屏幕創建不同的layout文件,在這個例子中,我們需要創建res/layout/rect_activity_wear.xml和res/layout/round_activity_wear.xml兩個文件。像創建手持應用的layouts一樣定義這些layouts,但需要考慮可穿戴設備的限制。系統會在運行時根據屏幕形狀來inflate適合的layout。
取得layout views
我們為方形或圓形屏幕定義的layouts在WatchViewStub檢測到屏幕形狀之前不會被inflate,所以你的app不能立即取得它們的view。為了取得這些view,需要在我們的activity中設置一個listener,當屏幕適配的layout被inflate時會通知這個listener:
@Override
protected void onCreate(Bundle savedInstanceState) {
    super.onCreate(savedInstanceState);
    setContentView(R.layout.activity_wear);

    WatchViewStub stub = (WatchViewStub) findViewById(R.id.watch_view_stub);
    stub.setOnLayoutInflatedListener(new WatchViewStub.OnLayoutInflatedListener() {
        @Override public void onLayoutInflated(WatchViewStub stub) {
            // Now you can access your views
            TextView tv = (TextView) stub.findViewById(R.id.text);
            ...
        }
    });
}
使用感知形狀的Layout
包含在Wearable UI庫中的BoxInsetLayout類繼承自 FrameLayout,該類允許我們定義一個同時適配方形和圓形屏幕的layout。這個類適用於需要根據屏幕形狀插入間隔的情況,並讓我們容易地將view對其到屏幕的邊緣或中心。
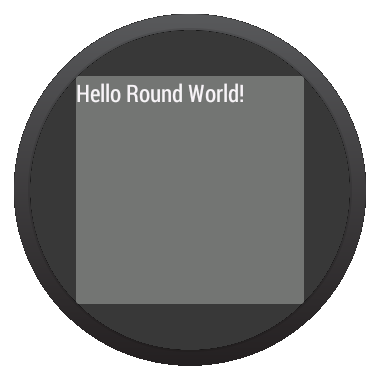
Figure 2. 在圓形屏幕上的窗口間隔
figure 2中灰色的部分顯示了在應用了窗口間隔之後,BoxInsetLayout自動將它的子view放置在圓形屏幕的區域。為了顯示在這個區域內,子view需要用下面這些值指定 layout_box屬性:
- 一個
top、bottom、left和right的組合。比如,"left|top"將子view的左和上邊緣定位在figure 2的灰色區域裡面。 all將所有子view的內容定位在figure 2的灰色區域裡面。
在方形屏幕上,窗口間隔為0,layout_box屬性會被忽略。
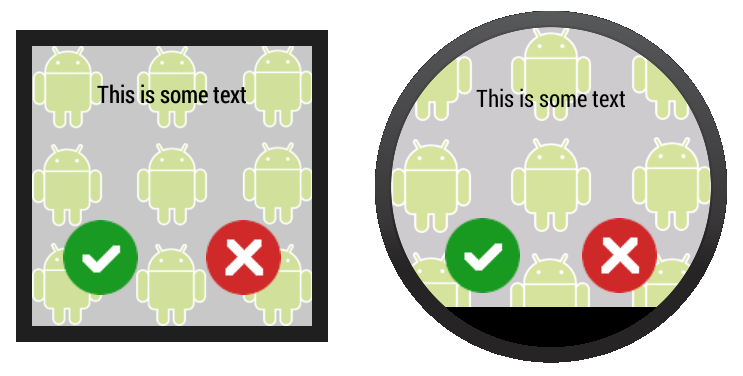
Figure 3. 同一個layout工作在方形和圓形屏幕上
在figure 3中展示的layout使用了BoxInsetLayout,該layout在圓形和方形屏幕上都可以使用:
<android.support.wearable.view.BoxInsetLayout
    xmlns:android="http://schemas.android.com/apk/res/android"
    xmlns:app="http://schemas.android.com/apk/res-auto"
    android:background="@drawable/robot_background"
    android:layout_height="match_parent"
    android:layout_width="match_parent"
    android:padding="15dp">

    <FrameLayout
        android:layout_width="match_parent"
        android:layout_height="match_parent"
        android:padding="5dp"
        app:layout_box="all">

        <TextView
            android:gravity="center"
            android:layout_height="wrap_content"
            android:layout_width="match_parent"
            android:text="@string/sometext"
            android:textColor="@color/black" />

        <ImageButton
            android:background="@null"
            android:layout_gravity="bottom|left"
            android:layout_height="50dp"
            android:layout_width="50dp"
            android:src="@drawable/ok" />

        <ImageButton
            android:background="@null"
            android:layout_gravity="bottom|right"
            android:layout_height="50dp"
            android:layout_width="50dp"
            android:src="@drawable/cancel" />
    </FrameLayout>
</android.support.wearable.view.BoxInsetLayout>
注意layout中的這些部分:
android:padding="15dp"
這行指定了BoxInsetLayout元素的padding。因為在圓形設備上窗口間隔大於15dp,所以這個padding只應用在方形屏幕上。
android:padding="5dp"
這行指定內部FrameLayout元素的padding。這個padding同時應用在方形和圓形屏幕上。在方形屏幕上,按鈕和窗口間隔總的padding是20dp(15+5),在圓形屏幕上是5dp。
app:layout_box="all"
這行聲明FrameLayout和它的子views都被放在圓形屏幕上窗口間隔定義的區域裡。這行在方形屏幕上沒有任何效果。