第一个 SpringMVC Controller
SpringMVC,顾名思义,整个框架都是构建在 MVC 基础之上的,不了解 MVC 的同学请自行查阅有关资料。在前面的知识准备的基础之上,我们将写出完成第一个 Controller 的编写和运行。
准备工作
首先下载 Spring-Framework 的 binary 分发版本,这里使用的是 spring-framework-4.3.8.RELEASE-dist。
然后下载 Apache 出品的 common-logging,它是 Spring 依赖的一个库,这里使用的是 common-logging-1.2。
将以上的依赖解压缩之后,把那些 jar 包加入 IDEA 的依赖路径,注意以 javadoc 和 sources 结尾的 jar 包可忽略不计。
如果使用的是 IDEA Ultimate 版本(即专业版),那么可以利用 IDEA 提供的 template 直接新建和部署项目。感兴趣的同学可以参考网上的有关博客,例如: IDEA建立Spring MVC Hello World 详细入门教程 - 小墨的童鞋 博客园
Servlet 配置
前面提到过 SpringMVC 是构建在 Servlet 基础之上的,它对外提供了一个名为 DispatchServlet 的类,这个类相当于是 SpringMVC 和 Servlet API 的一个交界点。
顾名思义,它也是 SpringMVC 当中对于请求处理的一个分发器。(它将 Servlet 传递过来的请求根据 URL 分发给对应的 Controller)
在前面的内容中我们可以看到,通过在 web.xml 文件里配置
url-pattern,也可以起到分发请求的作用。
但是,如果有大量的 URL 都需要在 web.xml 进行配置时,整个 web.xml 就变成了一个灾难。
因此很多 Web 框架都选择避免 web.xml,在此之上构建自己的请求分发机制。
首先我们修改 web.xml:
<?xml version="1.0" encoding="UTF-8"?>
<web-app version="2.4" xmlns="http://java.sun.com/xml/ns/j2ee"
         xmlns:xsi="http://www.w3.org/2001/XMLSchema-instance"
         xsi:schemaLocation="http://java.sun.com/xml/ns/j2ee
http://java.sun.com/xml/ns/j2ee/web-app_2_4.xsd">

    <servlet>
        <servlet-name>MyFirstServletName</servlet-name>
        <servlet-class>org.springframework.web.servlet.DispatcherServlet</servlet-class>
        <load-on-startup>1</load-on-startup>
    </servlet>

    <servlet-mapping>
        <servlet-name>MyFirstServletName</servlet-name>
        <url-pattern>/*</url-pattern>
    </servlet-mapping>
</web-app>
在修改 Servlet 为 Spring 提供的 DispatcherServlet 之外,还有两点需注意:
- 加入的
load-on-startup参数,作用:告知 Container 在启动的时候就加载这个 Servlet(而非收到请求时才加载) - 使用了
/*的 wildcard URL,作用:符合/*的 web 路径(即所有的请求)都将由 DispatcherServlet 处理。
编写 Controller
相比直接使用 Servlet API,编写 Controller 更简洁方便。
我们创建一个 MyFirstSpringController 类:
package com.skyline;

import org.springframework.stereotype.Controller;
import org.springframework.web.bind.annotation.RequestMapping;
import org.springframework.web.bind.annotation.RequestMethod;
import org.springframework.web.bind.annotation.ResponseBody;

@Controller
public class MyFirstSpringController {
    @RequestMapping(value = "/hello", method = RequestMethod.GET)
    public @ResponseBody String Hello() {
        return "Hello, SpringMVC.";
    }
}
这里使用了若干 Annotation 来简化代码。
- 通过
@Controller我们将一个普通 Java 类标记成一个 Controller 类。 - 通过
@RequestMapping和@ResponseBody我们将一个普通函数标记成可以处理 GET 请求,同时返回字符串的 Handler。
SpringMVC 配置
我们编写了一个 Controller 之后,怎么样让 DispatchServlet 找到我们编写的 Controller 呢?
SpringMVC 提供了使用 xml 配置的方法:
在 WEB-INF 文件夹下,也就是 web.xml 隔壁,创建一个 MyFirstServletName-servlet.xml(注意命名
<?xml version="1.0" encoding="UTF-8"?>
<beans xmlns="http://www.springframework.org/schema/beans"
    xmlns:xsi="http://www.w3.org/2001/XMLSchema-instance"
    xmlns:p="http://www.springframework.org/schema/p"
    xmlns:context="http://www.springframework.org/schema/context"
    xsi:schemaLocation="
        http://www.springframework.org/schema/beans
        http://www.springframework.org/schema/beans/spring-beans.xsd
        http://www.springframework.org/schema/context
        http://www.springframework.org/schema/context/spring-context.xsd">

        <bean class="com.skyline.MyFirstSpringController"/>

</beans>
上面的配置中,我们将编写的 MyFirstSpringController 加入了 beans 列表,SpringMVC 就能找到我们的 Controller 并且进行初始化了。
部署
和前面提到的 Tomcat 部署过程类似,首先我们将类生成的 class 文件拷贝到 WEB-INF/classes 下。同时,由于引入了依赖,我们还需要将 Spring 以及之前提到的 common-logging jar 包拷贝到 WEB-INF/lib 目录下。
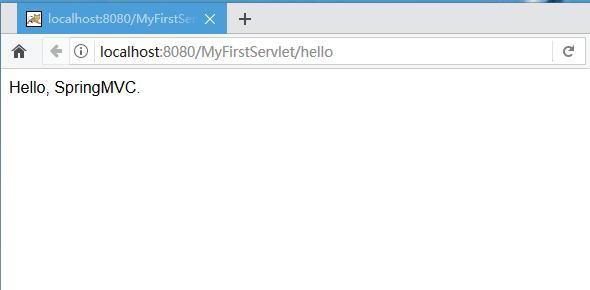
完成以上一切,然后启动 Tomcat,浏览器打开对应地址,可以看到运行的结果: